Prepare for your Rwenzori trek with this expert 16-week training plan, covering cardio, weighted pack hiking, altitude prep, and a printable checklist. Plan your trek today.
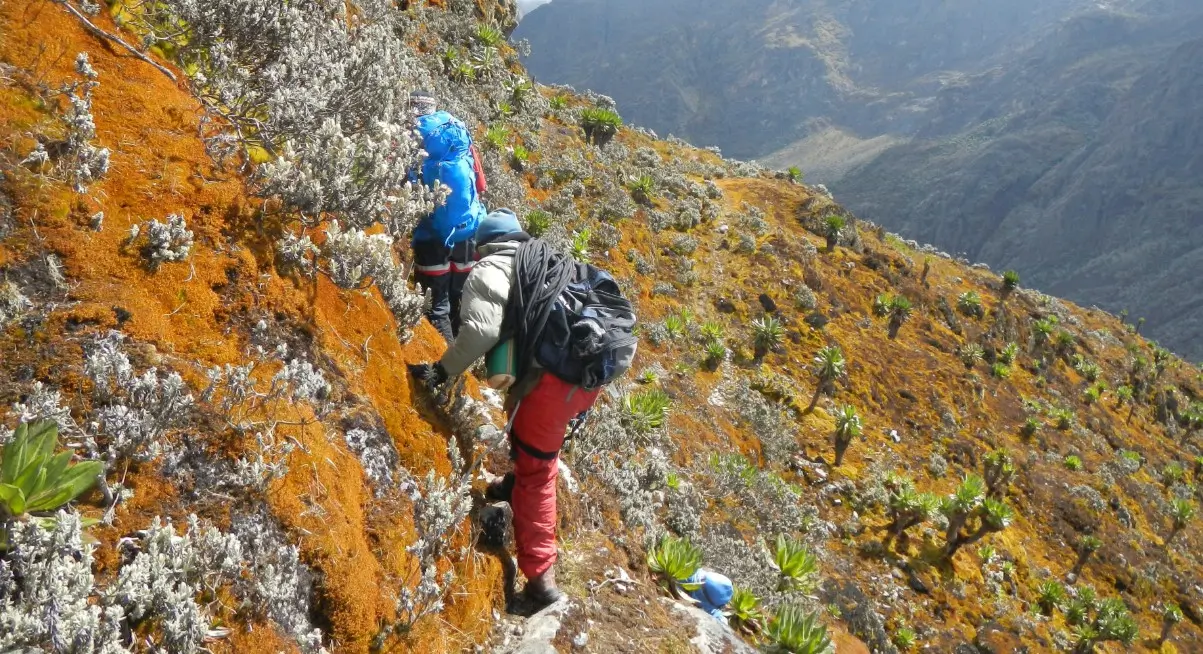
Why Your Training Plan Matters More to the Rwenzori Than Anywhere Else in Africa. The first thing you feel on the approach to Margherita Peak is not the cold or the altitude; it is the ground. The Rwenzori Mountains do not offer you a trail in any conventional sense. They offer you a living obstacle course of submerged roots, chest-deep peat bogs, vertical walls of saturated earth, and moss-draped ladders fixed into rock faces that have been wet since the last ice age. Every step has weight. Every meter of elevation costs more than Kilimanjaro or any other African route. This is not meant to discourage you. It is meant to ensure you arrive prepared.

Over the years spent guiding expeditions on the Central Circuit Trail and the Kilembe Trail, one pattern repeats itself with almost clockwork regularity: the trekkers who struggle are not always the ones who are unfit. They are the ones who trained for the wrong things. They ran on flat roads and never spent hours on a loaded pack. They did gym sessions but never tested their aerobic engine against sustained vertical gain. They were fit in the gym sense of the word, and the Rwenzori found them out anyway.
This 16-week plan was specifically designed for the demands of the Rwenzori, based on Rwenzori Trekking Safaris’ observations while guiding trekkers at altitude, in equatorial rain, and through terrain that changes character by the hour. It covers cardio conditioning, weighted pack hiking, stair and vertical training, core strength, altitude preparation, recovery, and a printable checklist. You’ll know what to do and what not to do each week before you lace up your boots at Nyakalengija and hit the trail.
Understanding What the Rwenzori Actually Demands of Your Body
Before designing any training plan, you need to understand the specific physiological stressors you are preparing for. The Rwenzori is not simply a long hike at high altitude. It combines several challenges simultaneously, and no single one of them can be isolated from the others.
The Altitude Factor
The 7-day Central Circuit route to Margherita Peak climbs from roughly 1,600 metres at Nyakalengija base to 5,109 metres at the summit of Mount Stanley. At that elevation, the available oxygen in each breath drops to approximately 53% of sea-level pressure. Symptoms of acute mountain sickness, headache, nausea, disrupted sleep, and reduced appetite can appear at camp elevations of 3,500–4,000 metres, well before the summit attempt. Rwenzori’s notoriously persistent cloud cover means that nights above 3,800 metres are genuinely cold, adding thermal stress to altitude strain. Understanding how cold it gets on Margherita Peak is essential reading before you design your preparation.
The Terrain Factor
Unlike Kilimanjaro, which follows clear, if steep, scree paths, Rwenzori forces every muscle group to function simultaneously as a stabiliser. The bog sections between John Matte Hut and Bujuku Valley require you to extract each leg from dense, sucking peat while maintaining balance with a loaded pack. The root forests of the lower slopes demand continuous micro-adjustments from ankles, calves, and hips. This is precisely why flat road running, however vigorous, is an insufficient training method in isolation. Anyone seriously considering the 8-day Kilembe Trail or the 13-day six-peaks expedition needs to have spent significant training hours on uneven terrain under load.
The Duration Factor
Even a moderate 6-day Rwenzori trek involves 5–9 hours of active movement each day for consecutive days. This is not like a single long hike; it is repeated effort with incomplete recovery and cumulative fatigue. Training for this means practising back-to-back hiking days, not just working toward a single peak distance. Our article on how challenging trekking the Rwenzori is discusses the cumulative fatigue question in detail; it is worth reading early in your preparation.
The Moisture and Cold Factor
Wet feet, wet gloves, and perpetually damp clothing create a specific kind of fatigue that is difficult to replicate in training but important to acknowledge. Most cases of hypothermia and trench foot on the mountain are caused by the insidious combination of moisture and altitude-induced cold. Our complete medical guide to trekking the Rwenzori covers these risks thoroughly. During training, the closest you can get to simulating such conditions is deliberately training in rain gear and wet conditions, a practice that most people avoid but which pays significant dividends.
Before You Begin: Assessing Your Starting Fitness Level
Sixteen weeks is a significant training block, but it is not unlimited. If you are currently sedentary, if you walk to work and perhaps take the stairs, this plan will get you fit enough for one of the shorter routes, such as the 3-day Mahoma Loop or the 4-day Mutinda Lookout route via the Kilembe Trail. If you are aiming for Margherita Peak on a summit route of 7 days or more, you will need a moderate baseline before starting this plan, meaning you can already walk briskly for two hours without significant discomfort.
Do not skip the honest self-assessment. Our guide provides a frank breakdown of fitness benchmarks by route difficulty to help you determine if you need to be very fit to climb the Rwenzori Mountains. Read it before committing to a specific itinerary, as your choice of trek should match both your current fitness and your training trajectory over the coming months.
GUIDE INSIGHTThe single biggest training mistake I see is people focusing on maximum distance. The Rwenzori is not won by distance; it is won by hours under load on consecutive days. A trekker is better prepared by hiking for five hours with a 10-kilogram pack on Saturday and four hours on Sunday than by doing a single 15-kilometer trail run. Train like the mountain will feel: long, wet, vertical, and repeated. |
The 16-Week Training Plan: Four Phases, One Mountain
The plan divides into four four-week phases, each building logically on the last. Phase 1 establishes an aerobic foundation. Phase 2 introduces vertical loading and pack weight. Phase 3 simulates multi-day trekking conditions at peak volume. Phase 4 tapers intelligently so you arrive on Day 1 fresh, not depleted.
The weekly schedule table below provides an at-a-glance overview. The detailed sections that follow explain the logic, exercises, and adaptations you need for each phase.
| Week | Phase Focus | Cardio / Week | Hiking Pack | Strength Sessions | Key Notes |
| 1 | Foundation | 3×30 min easy jog or brisk walk | 1×90 min flat hike, no pack | 2× full-body gym (light) | Establish a baseline: sleep. 8 hrs nightly |
| 2 | Foundation | 3×35 min | 1×2 hr flat hike, 3 kg pack | 2× gym – add core circuit | Assess any niggles early |
| 3 | Foundation | 3×40 min | 1×2.5 hr, 5 kg pack + some elevation | 2× gym + yoga/stretching | Begin nasal breathing drills |
| 4 | Foundation | 4×35–40 min | 1×3 hr, 5 kg + one hill session | 2× gym + 1 core-only | Deload if fatigued |
| 5 | Vertical Load | 3×45 min (add hills) | 1×3 hr hike, 7 kg pack, 400m gain | 2× gym – add weighted step-ups | Introduce stair sessions 2×/week |
| 6 | Vertical Load | 3×45 min + 1×15 min stair session | 1 × 3.5 hr, 8 kg, 500m gain | 2× gym + 1 stair circuit | Track heart rate recovery |
| 7 | Vertical Load | 3×50 min + 1×20 min stairs | 1×4 hr, 8 kg, 600m gain | 2× gym + 1 core-only | First long back-to-back weekend hike |
| 8 | Vertical Load | 3×50 min + stair session | 1 × 4.5 hr, 9 kg, 600–800m gain | 2× gym | Mini-taper (reduce 20%) at end of week |
| 9 | Simulation | 3×50–55 min + 1 trail run | 1×5 hr, 10 kg, 800m gain | 2× gym – single-leg focus | Add back-to-back hikes Sat/Sun |
| 10 | Simulation | 3×55 min + 1 trail run | Sat 5 hr / Sun 3 hr, 10 kg | 2× gym + breathing drills | Simulate consecutive trekking days |
| 11 | Simulation | 3×55 min + 1×trail run | Sat: 6 hr / Sun: 3.5 hr, 10–12 kg | 2× gym | Highest weekly volume – manage fatigue |
| 12 | Simulation | 3×50 min (slight taper) | 1×5 hr, 10 kg | 2× gym + full stretch session | Active recovery – sleep priority |
| 13 | Sharpening | 3×45–50 min | 1×4 hr, 10 kg | 2× gym – maintain, do not increase | Confirm kit list; test all gear |
| 14 | Sharpening | 3×40–45 min | 1×3.5 hr, 8 kg | 1× gym + 1 yoga/mobility | Begin reducing intensity |
| 15 | Taper | 2×35 min easy | 1×2.5 hr, 6 kg | 1× light gym session | Focus on sleep, hydration, food quality |
| 16 | Taper | 2×20–30 min easy walk/jog | 1×1.5 hr easy walk | Bodyweight mobility only | Travel week – arrive 1–2 days early |
Phase 1: Weeks 1 to 4: Building the Aerobic Foundation
Phase 1 is about establishing the habit and the engine. You are not trying to do impressive sessions; you are trying to adapt your cardiovascular system to sustained effort, begin conditioning your joints and tendons to load-bearing activity, and establish the sleep and recovery routines that will carry you through the harder phases to come.
Cardio Training in Phase 1
The target for the first four weeks is three sessions per week of 30 to 40 minutes of moderate-intensity aerobic exercise, such as brisk walking, easy jogging, cycling, or rowing. The emphasis is on consistency, not intensity. If you have not been running recently, start with brisk walking and introduce jogging intervals progressively. The key marker is that you can hold a conversation throughout; this activity is working at roughly 60–70% of maximum heart rate, which is precisely the zone that builds aerobic capacity without creating excessive fatigue.
As the weeks progress, gradually extend sessions from 30 to 40 minutes. By week 4, you should feel comfortable running or walking briskly for 40 minutes without needing to slow down significantly. Do not rush the process. The body adapts to aerobic training more slowly than most people expect, and the tendons and ligaments that support your joints, which will be under significant stress on the mountain, adapt more slowly than muscles. Impatience in Phase 1 is the most common route to injury.
Hiking with a Loaded Pack
From Week 1, you should do at least one longer outing each week on foot, outside, ideally on unpaved terrain. Week 1 is a 90-minute flat walk; by Week 4 it should be a three-hour walk with 5 kg in the pack and some elevation gain. The pack is important from the beginning because it changes the biomechanics of walking: your core, lower back, hip flexors, and knees all experience loads they would not encounter walking without weight, and the earlier they begin adapting, the better. Use a daypack loaded with water bottles, books, or a weight vest if you do not yet own a trekking pack.
Choose your boots carefully. On the Rwenzori, wet feet are essentially inevitable at certain elevations, which is why the gear considerations for trekking the Rwenzori are more specific than on any other African mountain. Whatever boots you plan to use on the trek, they should be the boots you train in, beginning now. Leather or rubber-soled boots require significant break-in time, and you would rather not discover a heel-blister problem at 4,000 metres.
Strength Training in Phase 1
Two full-body gym sessions per week are sufficient in Phase 1. The goal is not to build bulk excess muscle mass, which increases the metabolic demand at altitude without improving trekking performance, but to build functional strength in the movements you will use on the mountain: squats, lunges, step-ups, deadlifts, rows, and planks. Focus on movement quality and controlled tempo rather than heavy loads. Supplement these sessions with a 10-minute core circuit targeting the lower abdominals, obliques, and deep stabilisers of the spine. The Rwenzori rewards the trekker with a strong core more than almost any other mountain because so much of the terrain requires lateral balance on unstable footing.
The Nasal Breathing Drill
Start practicing nasal breathing during your easy cardio sessions in Week 3. This is not a mystical practice; it is a proven method of improving respiratory efficiency at altitude. When you are forced to breathe through your nose at the same effort level, your body gradually increases its tolerance for elevated carbon dioxide, which is one of the main drivers of the breathing urgency you feel at high altitude. It is uncomfortable at first. Start with 15-minute blocks during leisurely walks, and do not use it during hard efforts.
Phase 2: Weeks 5 to 8: Loading Up and Going Vertical
By Week 5 you should have a solid aerobic base and joints that have adapted to the basic demands of loaded walking. Phase 2 introduces vertical gain, heavier pack weights, and stair climbing, the three training elements that most specifically mimic the sustained ascent you will experience on routes like the 8-day Cheptegei Peak Kilembe Trail hike or the Central Circuit approach to Mount Speke.
Introducing Vertical Gain
Every weekly hike in Phase 2 should include deliberate elevation gain, increasing from approximately 400 metres in Week 5 to 800 metres by Week 8. If you live in flat terrain, find any hill you can repeat: a car park ramp, a footbridge approach, a road that climbs, or anything that keeps you on an upward gradient for sustained minutes. The ideal training scenario is a trail that gains 400–600 metres over 3–5 kilometres, which you repeat under load. What matters is the vertical, not the horizontal distance.
Descending is also training. The eccentric load on the quadriceps during descent is one of the primary sources of leg soreness after a full Rwenzori trekking day, and it is specifically difficult to prepare for without actually descending hills. Do not rush descents during training; practice the short-step, slightly bent-knee technique, which reduces impact and protects the knee joints on long descents.
Stair Climbing
Two stair-climbing sessions per week of 20–30 minutes are introduced in Phase 2. This is the single most underrated training tool for high-altitude trekking. A consistent stair-climbing session at a moderate pace elevates heart rate into the target zone, loads the glutes, hip flexors, and calves in a pattern identical to a steep trail ascent, and builds the specific muscular endurance that road running cannot replicate. Office staircases, stadium steps, parking structures, anything works. Wear your trekking pack.
Increasing Pack Weight
Move from 5 kg to 9 kg across the four weeks of Phase 2. On the mountain, your daypack for summit day will weigh 8–12 kg depending on gear carried. Your porters will carry your main duffel, but summit day involves your personal gear, water, snacks, emergency layers, and technical equipment such as crampons and an ice axe. Trekkers who have never hiked with that weight for more than an hour are often surprised by how much it changes their gait, their fatigue rate, and their balance on uneven ground.
The First Back-to-Back Weekend
By Week 7, schedule your first back-to-back hiking weekend: a longer hike on Saturday (4–4.5 hours, loaded) followed by a shorter hike on Sunday (2–2.5 hours). This is the closest simulation to consecutive trekking days that most people can achieve in urban environments. Pay attention to how your body feels on Day 2. Stiffness, fatigue, and slightly reduced performance on the Sunday hike are normal and expected; learning to move through that fatigue without compromising technique is itself a training outcome.
TRAINING WARNINGWeeks 7 and 8 represent the first significant volume spike. This phase is where overuse injuries, particularly in the Achilles tendon, IT band, and patella tendon, are most likely to appear. At the first sign of persistent joint pain (as distinct from normal muscle soreness), reduce your load immediately and allow 48–72 hours of complete rest before resuming. A minor injury managed early is a brief interruption. An ignored injury in Week 7 can end your training block entirely. |
Phase 3: Weeks 9 to 12: High-Volume Simulation
This is the hardest phase of the plan. Weeks 9 through 12 represent peak training volume and the closest your preparation will get to replicating the actual demands of a Rwenzori trek. By the end of Phase 3, you should be capable of carrying a 10–12 kg pack for 5–6 hours on consecutive days over hilly terrain. Trekkers who complete this phase successfully will find that even the most demanding sections of the 13-day 6-peaks expedition feel manageable by comparison.
The Back-to-Back Simulation Weekends
The centrepiece of Phase 3 is the Saturday-Sunday hiking block. In Weeks 10 and 11, target a Saturday hike of 5–6 hours with 10–12 kg and 600–800 metres of vertical gain, followed by a Sunday hike of 3–3.5 hours with the same pack. Eat well the evening before each day, hydrate aggressively, and wear the same boots and socks you plan to use on the mountain. These weekends are your most important training sessions of the entire plan. If you can only do one thing from Phase 3 perfectly, make it these two weekends.
Single-Leg and Stability Strength Work
Gym sessions in Phase 3 shift towards single-leg movements: Bulgarian split squats, single-leg deadlifts, step-down exercises from a box, and single-leg calf raises. The reason is specific to the Rwenzori terrain. When you are picking your way through a root forest or crossing a log bridge over a bog, you are effectively doing a sequence of single-leg loading tasks with a heavy pack. Bilateral squat strength is much less transferable to this than unilateral strength and balance.
Trail Running
If you are a runner, Phase 3 is a good time to introduce one trail run per week. Trail running on different types of ground helps develop the nerve pathways and balance skills that keep your ankles safe on the Rwenzori’s uneven surfaces. Even 45–50 minutes on a forest path or grassy hill is far more specific preparation than the same time on a road. If you are not a runner, a brisk hilly walk with trekking poles serves the same proprioceptive function.
Altitude Exposure Opportunities
If you have any opportunity to spend time at altitude, even a weekend at 1,500–2,000 metres take it during Phase 3. The physiological adaptations to altitude (increased red blood cell production, improved capillary density in muscle tissue, and enhanced respiratory efficiency) begin with relatively modest exposures and can meaningfully improve your acclimatisation trajectory once you reach Rwenzori. Our article on acclimatisation strategy for the Rwenzori explains the science in detail. Mountain huts, ski resorts, and highland national parks can all provide brief altitude exposures.
Gear Testing Under Load
Phase 3 is also when you should be testing all summit-day gear in realistic conditions. Wear your full waterproof system in rain. Test your gloves at cold temperatures. Understand what your crampon bindings feel like when you are tired and your fingers are cold. On the Rwenzori, particularly on the approach to Margherita Peak via the Elena glacier, there is no forgiving moment to discover that your crampon strap does not lock properly or that your boot gaiter does not seal over a certain boot shape.
Phase 4: Weeks 13 to 16: Sharpening and Taper
The taper phase is the most psychologically difficult part of any training plan. After three months of building volume, reducing the training load feels counterintuitive, even lazy. But the physiology is unambiguous: the adaptations your body has made during Phase 3 consolidate during the taper. Reducing volume while maintaining some intensity allows the musculoskeletal system to repair, glycogen stores to top up fully, and the immune system, chronically suppressed during high-volume training, to strengthen. Arriving at the Rwenzori fresh is not a luxury; it is a tactical necessity.
Weeks 13 and 14: Reducing Volume
Cut your hiking distance by roughly 20% in Week 13 compared to your Phase 3 peak. Drop pack weight slightly (from 12 kg to 10 kg, then to 8 kg by Week 14). Maintain two strength sessions per week but prioritise mobility and flexibility over heavy loads. This is a beneficial time to add yoga, deep stretching, and foam rolling, all of which improve joint range of motion and accelerate recovery from the accumulated tissue loading of Phase 3.
Weeks 15 and 16: Active Rest
The final two weeks are not zero-activity weeks; they are controlled, simple-movement weeks. Short, uncomplicated jogs or walks of 20–35 minutes keep the cardiovascular system primed without imposing meaningful fatigue. A single hike of 1.5–2.5 hours with a light pack reminds the body of the movement patterns without stressing it. Sleep becomes the priority in these weeks. Arrive at the Rwenzori rested, hydrated, and with a full nutrient reserve.
Practical Preparations During Phase 4
Use the mental bandwidth freed by reduced training in Phase 4 to finalise logistics. Confirm your itinerary and booking with Rwenzori Trekking Safaris. Read the routes and departure dates carefully. Apply for your Uganda e-visa at least two weeks before departure. Arrange travel insurance that specifically covers high-altitude trekking with helicopter evacuation. Complete a final gear checklist. Our guide to crampons and ropes for the Rwenzori and our climbing gear checklist cover everything you need.
Altitude Preparation: What You Can Do From Sea Level
Most people training for a Rwenzori trek live at or near sea level and have no practical way to spend weeks at altitude before their trip. This is a real constraint, but not an insurmountable one. The most effective altitude preparation available to sea-level trekkers is not an altitude simulation; it is arriving at the mountain with maximum aerobic fitness, optimal hydration, and a conservative acclimatisation strategy for the mountain itself.
Acclimatisation on the Mountain
The best insurance against altitude sickness on the Rwenzori is choosing an itinerary that allows adequate time for the body to adapt. The classic “climb high, sleep low” principle is built into the better route structures: on the 7-day Central Circuit to Margherita, for example, trekkers spend a night at Bujuku Hut (3,962 m) before ascending further, allowing meaningful adaptation before the summit attempt. Routes that rush this process, particularly aggressive 5- or 6-day summit attempts, have lower success rates and higher rates of altitude sickness among sea-level trekkers. Our article on how many days it takes to reach Margherita Peak examines this topic in detail.
Diamox: The Guide’s Perspective
Acetazolamide (Diamox) is a carbonic anhydrase inhibitor that accelerates acclimatisation by stimulating the respiratory drive. Many expedition trekkers and guides use it prophylactically when ascending over 3,000 meters. It is effective; clinical evidence supports its use for the prevention of AMS, but it is not a substitute for physical preparation, and it does have side effects (tingling in the extremities, increased urination, and occasional nausea). Consult your GP at least 6 weeks before departure to discuss whether it is appropriate for you and to get a prescription. Do not take it for the first time on the mountain.
Breathing Techniques for High Altitude
Two breathing techniques are worth practicing during training. The first is the slow, deep diaphragmatic breath, consciously breathing into the belly rather than the chest, which maximises tidal volume and oxygen uptake per breath. The second is pressure breathing: exhaling forcefully through pursed lips to clear carbon dioxide from the lungs, which is commonly used by mountaineers above 4,500 metres. Neither technique requires special equipment; both can be practiced during your training hikes and especially during the final two weeks of your taper.
Hydration and Diet at Altitude
Dehydration at altitude significantly worsens AMS symptoms and reduces physical performance. Begin the habit of drinking consistently during training hikes, not waiting until thirsty, and carry this habit on the mountain. The target is approximately 3–4 litres of water per day during active trekking, more if you are sweating heavily. Iron-rich foods and complex carbohydrates in the weeks leading up to your trek support red blood cell production and provide sustained energy for the long days on the trail.
Core Strength for the Rwenzori: A Purpose-Built Circuit
Core strength in the Rwenzori is not about having visible abdominals. It is about the ability to maintain posture and spinal stability when carrying a loaded pack over unstable terrain for hours at a time. Trekkers with weak core muscles develop lower back pain, often by day 3 of longer routes, which compounds fatigue and reduces stride efficiency. The following circuit can be completed in 15–20 minutes, three times per week throughout the entire training plan.
The Rwenzori Core Circuit
Begin with a 2-minute plank, held in a position that maintains a straight line from heels to shoulders, without sagging through the hips or lifting the glutes. This is your baseline stability work. Complete 3 sets of 15 glute bridges, focusing on squeezing at the top and holding for 2 seconds. Add 3 sets of 12 dead bugs, the supine alternate-arm-and-leg extension that directly challenges the deep stabilisers of the lower spine without loading the spine in compression. Do 20 repetitions on each side of side-lying hip abduction to strengthen the gluteus medius, the muscle that helps keep your pelvis stable when you walk on one leg. Finish with 2 sets of 10 Romanian single-leg deadlifts using a light dumbbell, which simultaneously trains balance, posterior chain strength, and ankle proprioception. The whole circuit takes less than 20 minutes and specifically targets every stabilising structure that will be working overtime in the bogs of the Bujuku Valley.
Recovery, Nutrition, and Sleep: The Invisible Training Variables
Training is a stimulus. The adaptation, the actual improvement in fitness, happens during recovery. This is the part of the training plan that most people ignore, particularly in the high-volume phase, and it is the part that most determines whether you finish Phase 3 healthy or depleted.
Sleep
Seven to nine hours of sleep per night is not a preference; it is a physiological requirement during a 16-week training block of this intensity. Growth hormone, the primary driver of muscular repair and adaptation, is secreted almost exclusively during deep sleep. Consistently shortchanging sleep by an hour or two per night during Phase 2 and Phase 3 will meaningfully blunt your fitness gains and increase your injury risk. Track your resting heart rate each morning; a consistent elevation of 5–8 beats per minute above your normal baseline is a reliable early warning sign of accumulated fatigue.
Nutrition During Training
High-volume trekking training burns significant calories, typically 500–800 additional calories per day above the sedentary baseline on heavy training days. This is not the time for caloric restriction. Underfuelling during Phase 2 and Phase 3 leads to poor recovery, hormonal disruption, and reduced immune function. Focus on caloric sufficiency, high protein intake (1.6–2.0 grams per kilogram of body weight per day to support muscle repair), complex carbohydrates for sustained energy, and adequate fat for joint health and fat-soluble vitamin absorption.
Active Recovery
On the day after a long hike or hard training session, active recovery, a 30-minute easy walk, gentle swimming, or a yoga class is significantly more effective than complete rest for reducing muscle soreness and accelerating clearance of metabolic waste products from muscle tissue. Keep relaxing days genuinely; they are not a substitute for your harder training, and training harder on recovery days is one of the most common mistakes made during a long preparation block.
Testing Your Gear During Training: Why It Cannot Wait Until the Mountain

Test every piece of gear you plan to use on the Rwenzori during your training. This isn’t just about breaking in your boots; it’s about knowing how your gear works and its limits before they matter.
The Rwenzori’s permanent moisture environment makes waterproof performance more critical than on almost any other trek in Africa. Our deep-dive article on how much it rains in the Rwenzori Mountains and our practical guide to trekking in the rainy season both emphasise the fact that your outer layers must be genuinely waterproof and breathable. Wear your waterproof jacket in rain during training. Test your gaiters. If you notice condensation soaking through or seams leaking after two hours, replace the item before your trip, not upon your arrival in Kasese.
On summit day for routes like the 5-day Margherita Peak summit, you will need crampons, possibly an ice axe, and a rope harness. Our guide for whether snow appears on the Rwenzori Mountains explains exactly what the glacier conditions look like. Test fitting crampons to your boots at home in daylight before you do it at 4,800 meters in a headtorch.
Printable 16-Week Training Checklist.
Use the checklist below to track your progress through the plan. Print it, keep it visible, and work through it systematically. Each milestone represents not just a physical achievement but a concrete reduction in summit-day risk.
| Phase | Training Milestone / Action | Done ✓ |
| Wks 1–4 | Complete baseline fitness assessment (rest heart rate, step test) | ☐ |
| Wks 1–4 | Establish weekly cardio habit – min. 3 sessions per week | ☐ |
| Wks 1–4 | Purchase and break in hiking boots (Vibram sole, ankle support) | ☐ |
| Wks 1–4 | Buy a quality daypack; start training with a 3–5 kg load | ☐ |
| Wks 1–4 | Begin sleeping 7–9 hours consistently; track resting heart rate | ☐ |
| Wks 1–4 | Start nasal breathing drills during easy cardio sessions | ☐ |
| Wks 5–8 | Reach sustained 3–4 hr hikes with 7–9 kg pack load | ☐ |
| Wks 5–8 | Introduce 2× weekly stair-climbing sessions (min 20 mins each) | ☐ |
| Wks 5–8 | Include at least 400 m of vertical gain in weekly hike | ☐ |
| Wks 5–8 | Complete first back-to-back hiking weekend (consecutive days) | ☐ |
| Wks 5–8 | Book Rwenzori trek dates with Rwenzori Trekking Safaris | ☐ |
| Wks 9–12 | Peak weekly hike: 5–6 hrs, 10–12 kg pack, 800 m+ gain | ☐ |
| Wks 9–12 | Complete at least two back-to-back weekend hiking days | ☐ |
| Wks 9–12 | Spend a night at altitude (1,500 m+ facility or camping) if possible | ☐ |
| Wks 9–12 | Confirm Diamox prescription with GP (for high-altitude option) | ☐ |
| Wks 9–12 | Test all summit-day gear in cold, wet conditions | ☐ |
| Wks 9–12 | Run first full-kit weigh-in; adjust pack contents if over 12 kg | ☐ |
| Wks 13–16 | Taper load: reduce hiking distance/weight by 20% per fortnight | ☐ |
| Wks 13–16 | Complete gear checklist: crampons, gaiters, waterproofs, layers | ☐ |
| Wks 13–16 | Book flights and Uganda e-visa (apply 2+ weeks before departure) | ☐ |
| Wks 13–16 | Arrange travel insurance with high-altitude medical evacuation cover | ☐ |
| Wks 13–16 | Final 1.5 hr easy walk in full kit – confirm nothing chafes or rubs | ☐ |
| Pre-Trek | Arrive Kasese 1–2 days early to begin natural acclimatisation | ☐ |
| Pre-Trek | Rest, hydrate well, and avoid alcohol in the 48 hours before Day 1 | ☐ |
Matching Your Training Outcome to the Right Rwenzori Trek.
Not everyone who reads this plan will complete all 16 weeks perfectly, and not everyone’s goal is Margherita Peak. Here is a realistic guide to matching your training outcome to the appropriate route.
If You Complete Phases 1–2 and Partial Phase 3
You are a perfect match for the 3-day Mahoma Loop hike, the 4-day Mutinda Lookout via the Kilembe Trail, or the 4-day Rwenzori Waterfalls Hike. These routes take you into genuine Rwenzori wilderness without the high-altitude demands of Margherita or the multi-peak expeditions.
If You Complete Phases 1–3 Fully
You are ready for the 7-day Central Circuit; the 8-day Kilembe Trail to Margherita; or a single-peak summit like Mount Speke, Mount Baker via the Kilembe Trail, or the Mount Emin 7-day trek. These are classic Rwenzori summit experiences.
If You Complete All 4 Phases
You are in the best position to attempt the 8-day 3-peaks expedition (Stanley, Speke, and Baker); the 10-day 4-peaks expedition; or, for those genuinely prepared to push their mountaineering limits, the 18-day all-8-peaks expedition. If the 13-day 6-peaks route has been on your list, our honest assessment of whether the Rwenzori is worth climbing and the comparison with Kilimanjaro and Mount Kenya will help you understand exactly what distinguishes the Rwenzori from every other African peak experience.
Frequently Asked Questions: Training for a Rwenzori Trek
How fit do I need to be to trek the Rwenzori Mountains?
The fitness requirement varies significantly by route. For shorter treks such as the 3-day Mahoma Loop or the 4-day Mutinda route via the Kilembe Trail, a moderate baseline is sufficient; someone who can comfortably walk for two to three hours on undulating terrain will manage with good preparation. For summit routes to Margherita Peak (5,109 m) on Mount Stanley, a high level of aerobic fitness is genuinely required: you should be able to sustain 5–7 hours of hiking per day for multiple consecutive days carrying a 10 kg pack, including significant vertical gain. The terrain saturated with bog, root forest, and glacier is more physically demanding than Kilimanjaro’s. Completing this full 16-week plan will prepare you adequately for summit routes if you have a moderate aerobic baseline at the start.
Can I start the 16-week plan if I am not currently fit?
Yes, but with an important qualification: the plan assumes you can walk briskly for 60–90 minutes before you begin. Week 1. If you are currently sedentary or have not exercised consistently for 12 months or more, spend 4–6 weeks building a basic walking habit before starting Week 1. This “pre-phase” involves daily 30–45 minute walks and two bodyweight gym sessions per week. Beginning Phase 1, which is already capable of sustained movement, significantly reduces your injury risk and improves the training adaptations you will achieve across all 16 weeks.
How much weight should I carry in my training pack?
Begin with 3–5 kg in Week 1 and build progressively to 10–12 kg by the peak training weeks (Weeks 10–11). The final pack weight mirrors what you will carry on summit day at the Rwenzori, including water (at least 2 litres, which weighs 2 kg alone), food, emergency layers; a camera; and personal items. Training with the actual pack you plan to use on the trek and wearing it for the duration of your long hikes also helps you identify and resolve any fit or comfort issues before they become problems at 4,500 metres.
Do I need altitude training or an altitude tent to prepare for the Rwenzori?
Altitude tents and hypoxic training devices can provide a measurable acclimatisation benefit, but they are expensive, require consistent use, and disrupt sleep quality. They are not necessary for most trekkers. The most effective altitude preparation available to sea-level trekkers is: maximising aerobic fitness (which improves oxygen utilisation efficiency regardless of altitude); taking any available opportunities for mountain weekends at 1,500–2,500 meters; discussing Diamox prophylaxis with your GP; and choosing a Rwenzori itinerary with adequate acclimatisation time built in, typically 7 days or more for Margherita Peak routes.
How many days per week should I train for a Rwenzori trek?
The plan involves 4–5 active days per week at peak volume (Phases 2 and 3), including 3 cardio sessions, 1–2 hiking days, and 2 strength sessions. Some sessions can overlap (for example, a stair session counts as both a cardio and a vertical training session). Rest days are important, at a minimum two per week in the peak phase, to allow musculoskeletal recovery. The weekend-long hike is by far the most important single session each week. If time is genuinely constrained, prioritise the Saturday hike and stair sessions above all else.
Should I use trekking poles when training?
If you plan to use trekking poles on the Rwenzori, which most trekkers do, train with them from Phase 2 onwards. Poles change the biomechanics of both ascent and descent, redistributing approximately 20–25% of the load from legs to arms and shoulders. Trekkers who use poles for the first time on the mountain often find shoulder fatigue on Day 2 because the relevant muscles have not been conditioned. Carbon-fibre poles are lighter but more fragile; aluminium poles are heavier but better suited to the Rwenzori’s challenging footing. Our gear guides cover the specific pole recommendations for Rwenzori conditions.
Is the Rwenzori harder than Kilimanjaro to prepare for?
In most respects, yes. Kilimanjaro’s main routes follow well-maintained paths on stable ground with predictable terrain. The Rwenzori presents technical ground bogs, roots, rock sections, and glacier approaches that demand significantly higher levels of balance, stability, and sustained strength. The physical effort per kilometre is higher, and the cumulative fatigue across a multi-day trek is greater. Our detailed comparison of the Rwenzori versus Kilimanjaro versus Mount Kenya lays out the full honest assessment. If you have previously climbed Kilimanjaro, you will need to specifically add loaded pack training, vertical gain work, and stability training to prepare for the qualitatively different demands of the Rwenzori.
What should I do in the final week before my Rwenzori trek?
Week 16 is an active rest week. Two easy 20–30-minute walks or jogs keep the cardiovascular system primed without imposing fatigue. One final easy hike of 1.5 hours in your full kit confirms that nothing is rubbing, chafing, or fitting badly. Focus overwhelmingly on sleep (8 hours minimum), consistent hydration throughout the day, and nutritious meals rich in iron, complex carbohydrates, and protein. Avoid alcohol entirely in the 48 hours before your departure flight and in the 48 hours before Day 1 on the mountain. Arrive in Kasese 1–2 days early if your schedule allows. A day at 900–1,200 metres is a meaningful first step in the acclimatisation process, far better than landing and immediately beginning a trek.
Are you ready to Put Your Training to Work? Start Planning Your Rwenzori Trek
Sixteen weeks of deliberate preparation changes everything. It changes how your legs feel on Day 4 when the altitude begins to bite and the pack feels heavier than it did on Day 1. It alters your relationship with fatigue; you recognise it, know it’s temporary, and know how to get through it. Most of all, it changes what is possible. The Rwenzori Mountains, perhaps the most extraordinary and least-visited high-altitude wilderness in Africa, reward the prepared traveller with experiences that are genuinely unlike anything else on the continent.

Whether you are considering a first trek on the Kilembe Trail, an ambitious attempt on Margherita Peak, or the full 13-day 6-peaks expedition, the team at Rwenzori Trekking Safaris will help you design the right itinerary for your fitness, experience, and timeline. We work with trekkers at every fitness level, from first-timers exploring whether beginners can climb the Rwenzori to experienced mountaineers targeting every summit in the range.
GET IN TOUCHContact us to begin planning your custom Rwenzori trek. Share your preferred dates, the route you have in mind, and your current fitness levels, and we will create a personalised itinerary worthy of the Mountains of the Moon. Email: rwenzoritrekkingsafaris@gmail.com | WhatsApp: +256 773 256 104 Website: www.rwenzoritrekkingsafaris.com |


